PowerShell tutorial: Managing Windows Storage Spaces
This PowerShell tutorial shows users how to fully interact with Windows Storage Spaces, which will help them script the storage provisioning process.

Microsoft has greatly expanded the role of PowerShell in Windows server 2012. Although PowerShell has always offered at least some storage management capabilities, they have been greatly enhanced in the latest product version -- it's now possible to fully manage Windows Storage Spaces through PowerShell. This PowerShell tutorial is intended to familiarize users with some of the basics of storage management through PowerShell.
Windows Storage Spaces allows administrators to group physical disks into one or more storage pools. Before you can do this, however, you must identify those disks that are good candidates for inclusion in a storage pool.
PowerShell has long supported the Get-Disk cmdlet. But this cmdlet might not always show you all the physical disks that exist in a system. Look at Figure 1. While the computer on which the screen capture was taken contains several physical hard disks, the Get-Disk cmdlet displays only the boot drive and a Microsoft Storage Spaces device.

Fig. 1: Get-Disk cmdlet provides limited insight into physical hardware.
If your goal is to view a server's physical disks, you'll need to use the Get-PhysicalDisk cmdlet. In Figure 2, the cmdlet lists all the physical disks installed in the server. One thing to note in the figure is the CanPool field that indicates whether or not each disk can be included in a storage pool. In this case, none of the disks can be pooled because a storage pool has already been created; if you wanted to list only the disks that were good candidates for inclusion in a storage pool, you could use the following command:
Get-PhysicalDisk –CanPool $True

Fig. 2: Get-PhysicalDisk cmdlet lists the physical disks installed in the server.
Get-StorageSubsystem –FriendlyName *space*
As you probably know, Windows Storage Spaces makes use of the storage subsystem. When you create a storage space through PowerShell, you have to specify the storage subsystem's friendly name. There are a couple of ways to do this. One is to use the Get-StorageSubsystem cmdlet that returns a few different pieces of information, including the friendly name, as shown in Figure 3.

Fig. 3: Use the Get-StorageSubsystem cmdlet to determine the storage subsystem's friendly name.
An easier approach might be to include the Get-StorageSubsystem cmdlet in the command used to create a new storage pool. The New-StoragePool cmdlet is used to create a storage pool and it requires three parameters, including:
- A friendly name for the storage pool.
- The storage subsystem's friendly name.
- The physical disks you wish to include in the storage pool.
For example, let's pretend a storage pool does not exist on the server used to create the figures, and that we want to create a storage pool called My Storage Pool. Let's also assume we want to add any available disks to the storage pool and that we want to use the default storage subsystem. We can easily accomplish this using the elements discussed so far. The command would look like this:
New-StoragePool –FriendlyName "My Storage Pool" -StorageSubSystemFriendlyName {Get-StorageSubsystem –FriendlyName *space*} –PhysicalDisks {Get-PhysicalDisk –CanPool $True}
This command might look complicated, so let's break it down. If you remove the subcommands, the command looks like this:
New-StoragePool –FriendlyName "My Storage Pool" –StorageSubsystemFriendlyName –PhysicalDisks
The first portion of the command merely defines a name for the new storage pool. The second part provides the friendly name of the storage subsystem. In the case of the original command, there's a subcommand that retrieves the name, but it can be entered as a value if you know the name. The last part of the command specifies the physical disks to be included in the storage pool. Again, we're using a subcommand to retrieve the names of all the physical disks eligible for pooling, but we could alternatively list the disk names as values.
Once you've created a storage pool, you'll probably want to create one or more virtual disks within the storage pool. The cmdlet used to do this is New-VirtualDisk. To use this cmdlet, you must provide a friendly name for the virtual disk you're creating, the friendly name of the storage pool where the virtual disk will be created and the size of the virtual disk. The full command looks like this:
New-VirtualDisk –FriendlyName vDisk1 –StoragePoolFriendlyName "My Storage Pool" –Size {100 GB}
If you want to verify the existence of storage pools and virtual disks, you'll need to use the Get-StoragePool and Get-VirtualDisk cmdlets. These can be used without any parameters, as shown in Figure 4.
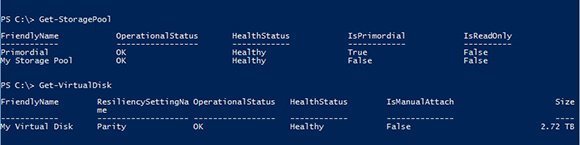
Fig. 4: Use PowerShell to verify the existence of storage pools and virtual disks.
PowerShell lets you fully interact with Windows Storage Spaces. This makes it possible to script the storage provisioning process, which is useful if you have multiple servers to set up.
About the author
Brien Posey is a Microsoft MVP with two decades of IT experience. Before becoming a freelance technical writer, Brien worked as a CIO for a national chain of hospitals and health care facilities. He has also served as a network administrator for some of the nation's largest insurance companies and for the Department of Defense at Fort Knox.